Adding Custom Fields to the Shopify Cart Page
Need to collect gift notes or VAT numbers? Learn how to manually add custom attributes to your Shopify cart without paying for extra apps.

Looking for a way to add a custom field to Shopify cart pages?
While working with any eCommerce platform, you might need to have some extra features or modifications in the default behavior or flow. In Shopify, if you need to collect some extra information from the customer then you need to have the extra input fields added.
In this article, I’ll show you step-by-step how to add custom fields to the Shopify cart page.
🧠 Why Add Custom Fields to the Cart Page?
Adding custom fields helps you collect additional information from your customers before checkout. This could include:
- Gift message or special delivery instructions
- Event date or custom engraving text
- Customer ID or reference number
- Personalized note or color choice
These small data inputs can improve user experience and make your fulfillment process smoother.
🛠️ Choosing the Right Theme File
For this case, we are considering the Shopify default theme “Debut”. If your store has any other theme then the file's name and code might be different but the overall idea of adding the custom changes will be easy for you to apply in those themes as well.
You can create and add as many custom form fields to your cart page. There is one tool called Shopify UI Elements Generator to easily generate the HTML and Liquid file code required for each form field that you want to add to your cart page.
🧩 Types of Custom Fields You Can Add
Depending on your use case, you can add different input types. Here are some common ones generated by the UI Elements Generator:
- Text field: For names, messages, or IDs.
- Textarea: For notes or instructions.
- Dropdown: For selecting size or options.
- Checkbox: For “Gift wrap this order” or consent fields.
- Date picker: For delivery or event dates.
🧰 Generate Code Using UI Elements Generator
Go to Shopify UI Elements Generator and select the type of form field, provide the field label. You can see the code generated automatically based on your provided values. We need to put this code on our theme’s cart page .liquid file.

✏️ Editing Theme Files
Login to Shopify admin and navigate to Online Store > Themes.
Choose your current theme, click on Actions dropdown > Edit code link. You will be able to see the theme files which we can edit.

📄 Locate Cart Template
Click on Sections and search for cart-template.liquid. Click on it, and you will see the code of the cart page.

🧱 Add Custom Field Code
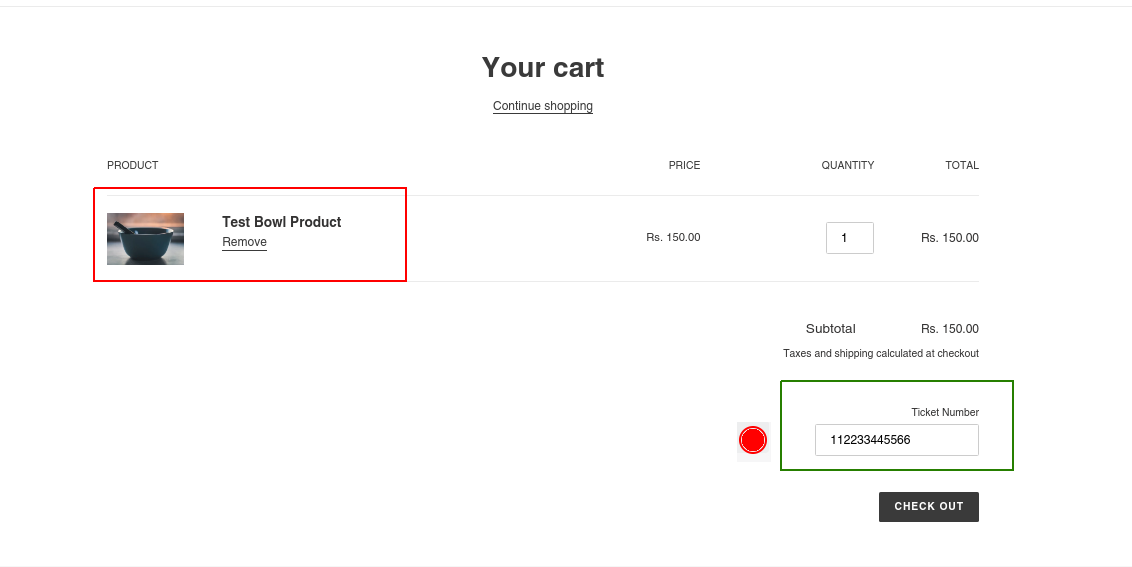
Decide the area of the cart page you want to add the custom page (between the <form> and </form> tags). In this example, we will place our copied code for the custom field “Ticket Number” below the shipping text(marked in the above image) you can place it anywhere between the form tags as per your requirements.
Save the file and go to the front end site cart page and refresh it. Now you can see the custom field added to the cart page.

🧾 Test and Verify the Field
Enter the value and complete the order process.
📦 Check the Order in Admin
Now go to Admin Panel > Orders listing. Select the recently created order and check the right side section. You can see our custom cart field value is visible.

🧩 View via Shopify REST API
If you are using the Shopify Rest API, then also you can see this custom field in order detail’s response under the notes_attributes key.

✅ Add Validation or Make Field Required
If you want to make the custom field mandatory, you can use basic JavaScript validation before form submission. Example:
document.querySelector('form').addEventListener('submit', function(e) {
  var ticket = document.querySelector('input[name="attributes[ticket_number]"]').value;
  if (!ticket.trim()) {
    alert('Please enter your Ticket Number before checkout.');
    e.preventDefault();
  }
});
🎨 Styling Your Custom Field
You can style the custom field using your theme’s CSS file to match your store design. Example:
.custom-cart-field {
  margin-top: 10px;
  padding: 8px;
  border: 1px solid #ddd;
  border-radius: 6px;
  width: 100%;
}
⚠️ Limitations and Theme Considerations
- This method works for most Shopify themes but may vary for custom or premium ones.
- Shopify Plus stores might prefer to use Checkout Extensibility instead.
- Fields added on the cart page don’t automatically appear at checkout unless stored as cart attributes.
🔍 Troubleshooting Common Issues
| Problem | Possible Fix |
|---|---|
| Field not showing on cart page | Check if added inside <form> tags and saved properly |
| Value not visible in order admin | Ensure name attribute is defined as attributes[custom_field] |
| Field styling looks off | Apply your theme’s CSS classes to maintain consistency |
💡 Summary
Adding custom fields to your Shopify cart page helps personalize user experience and capture extra data without custom apps. Whether you need a simple note field or complex inputs, Shopify’s UI Elements Generator makes it easy to create and embed the right code quickly.
With these steps and examples, you can confidently extend your cart functionality while maintaining a professional store design.

Ketan Patel
PHP & MySQL Performance Optimization Specialist
I specialize in diagnosing and fixing slow PHP applications, optimizing MySQL queries, and resolving backend bottlenecks in live production systems. My approach is metric-driven — identifying root causes through profiling, execution analysis, and structured optimization instead of guesswork.